Android studio basics
Theory
Android Studio is the official Integrated Development Environment (IDE) for Android app development based on JetBrains IntelliJ IDEA. With Android Studio, you can develop apps for all Android devices. In this topic, we will go through the installation process and overview the basic functions of this IDE.
§1. Installing
First, you need to download the Android Studio installer. All you have to do is visit the official Android Developers website, click the button "Download Android Studio", and agree to the terms and conditions. After the download is finished, launch the file.
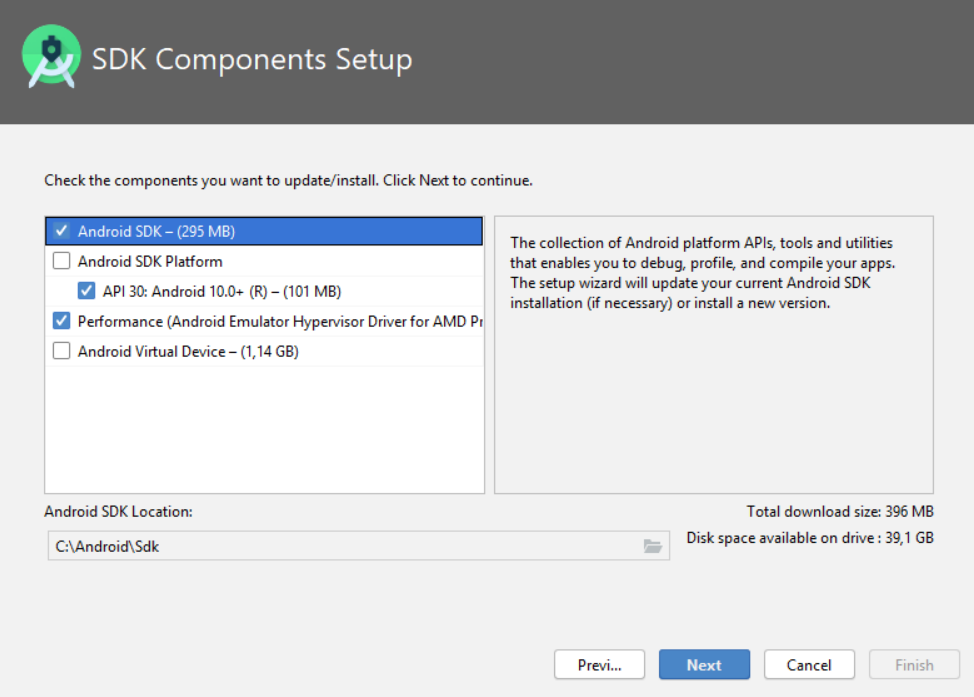
Open the installer file and click "Next". You will see a list of components you can install. It is recommended to install the Android Virtual Device (AVD). With this tool, you will be able to run and test your apps right on your computer. If your computer does not meet the requirements, you can simply uncheck this option.
Then, select the folder where you would like to have your Studio. Wait for the installer to extract everything it needs onto your machine. After that, launch Android Studio.
You will be asked to import settings. If it is your first time using Android Studio, just press "OK", and the setup wizard will pop up. Now you can choose the type of setup: Standard or Custom.
Choose "Standard" if you don't want to deal with a bunch of settings, and the IDE will do all the work for you. If you choose "Custom", you will be able to select where you would want to have your Software Development Kit (SDK) and whether you want to have your Virtual Device set up right away.
We're almost there! Now, Android Studio will download all the required files. When that is done, click "Finish". Congrats: you have successfully installed Android Studio!
After opening the IDE, you will be greeted by the Start screen:
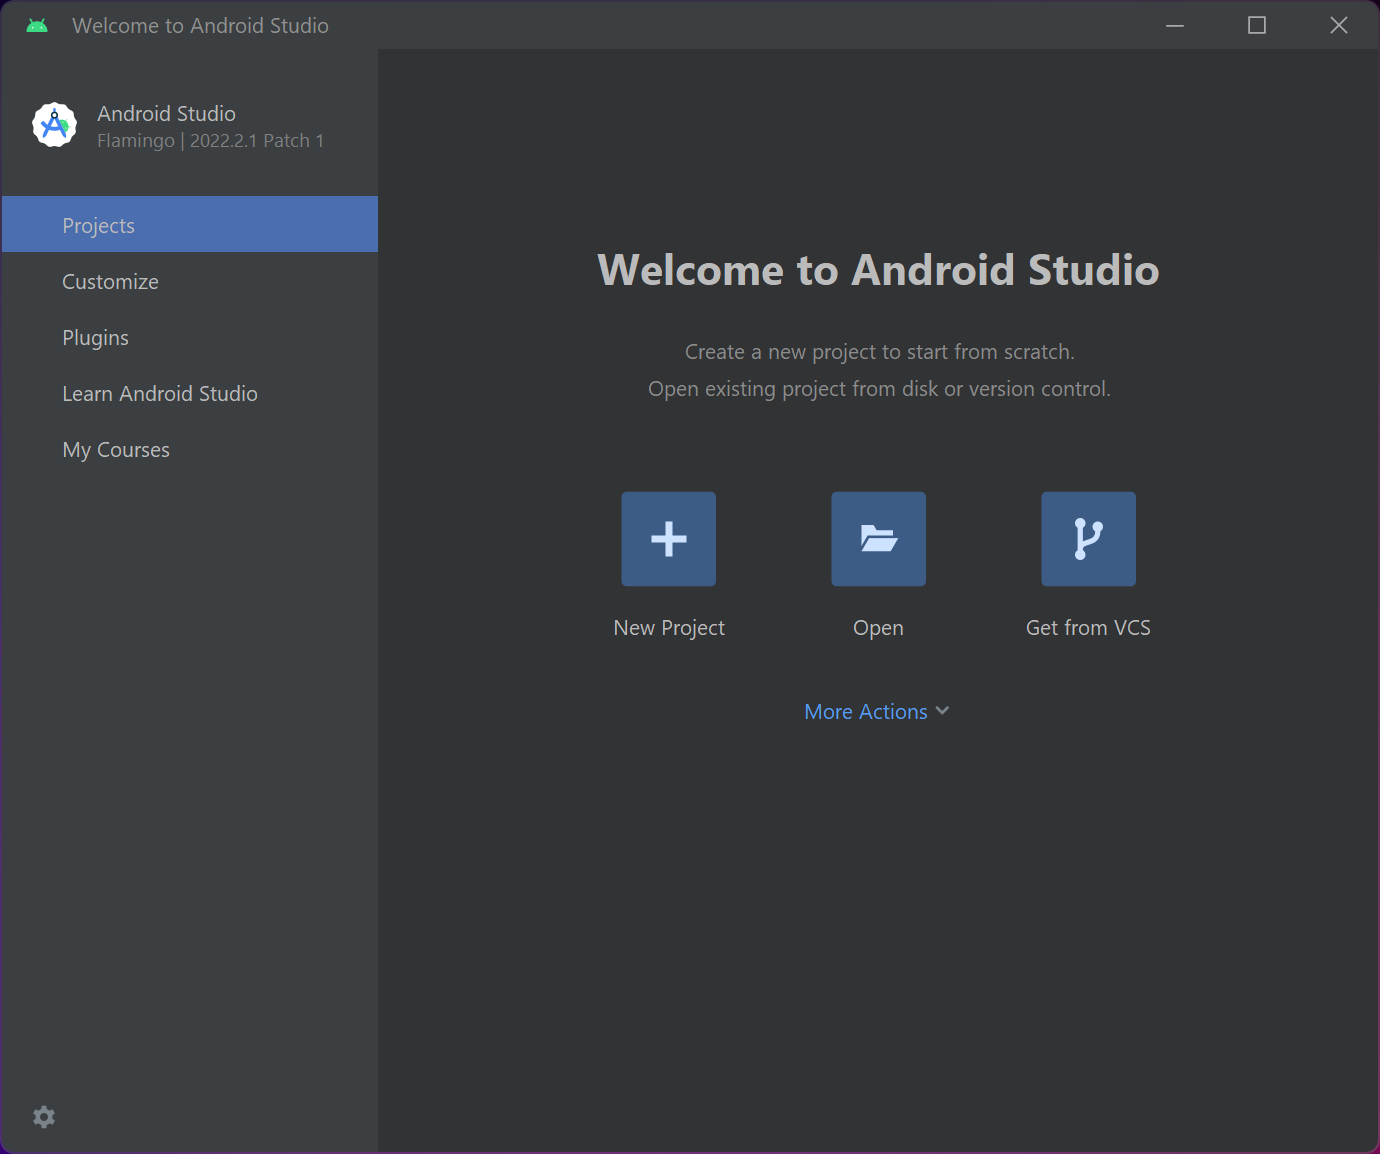
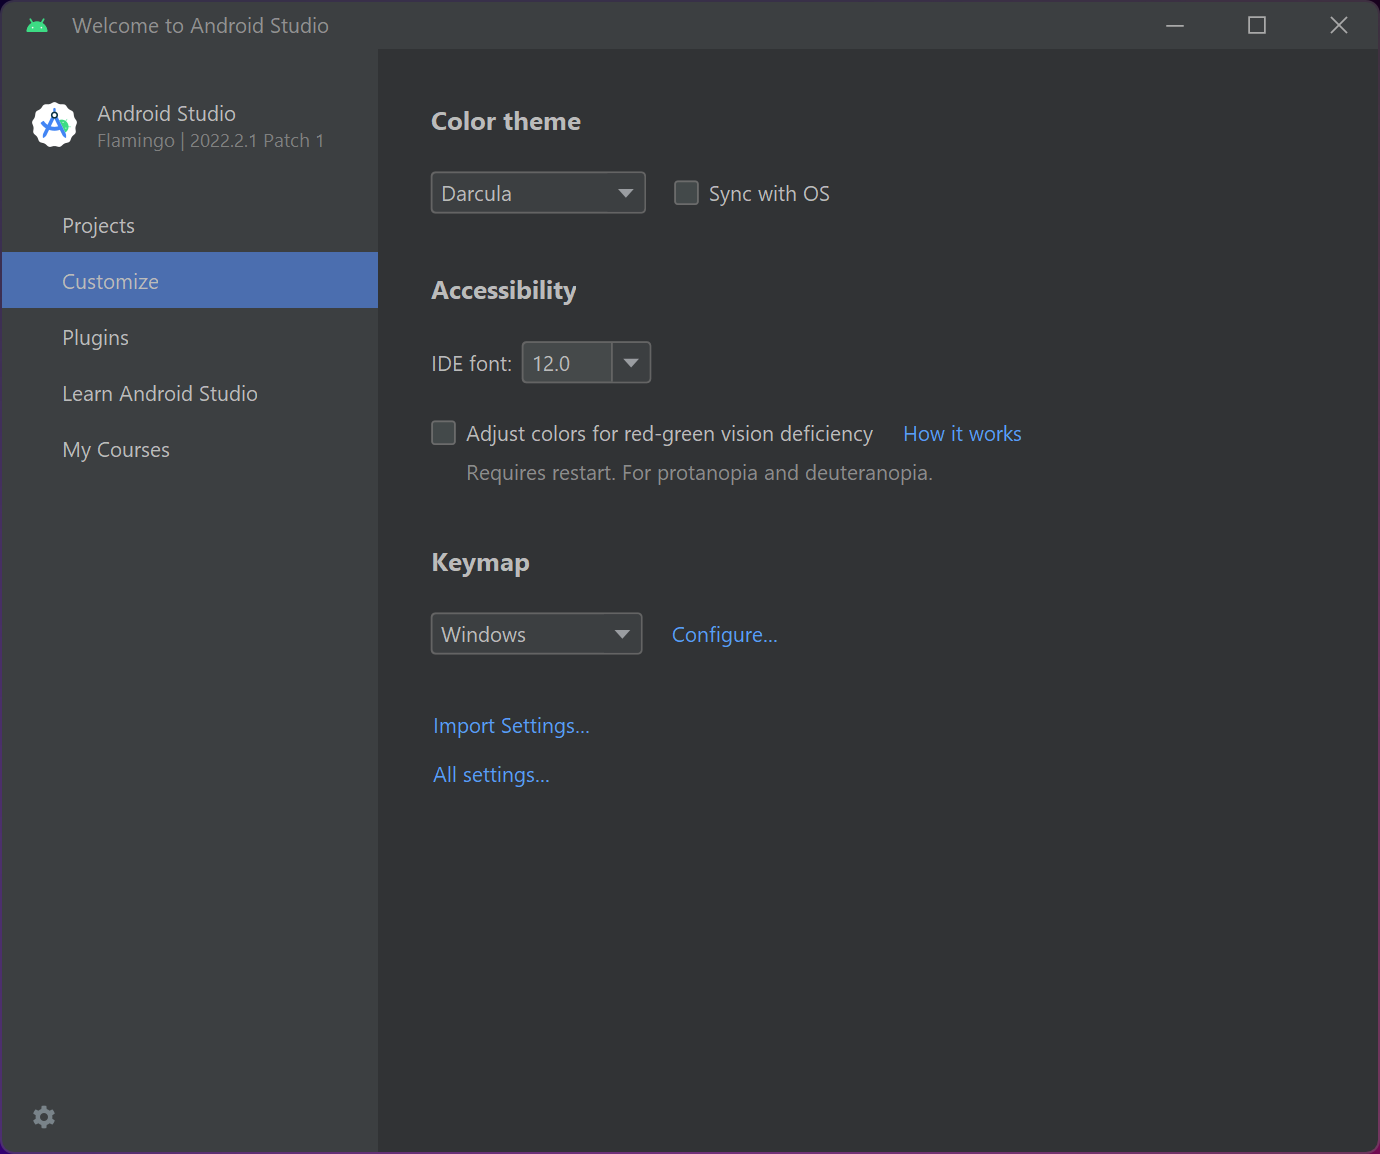
Here, you can see the most commonly used features of this screen. You can create a new Android Studio project by pressing the corresponding button, or open an existing project from your computer. Also, by pressing the "Customize" button you will be able to quickly access the IDE font and theme settings. You can also find the link to all settings in this tab:
§2. Setting up your first project
Let's create a new project and see what the main window looks like:
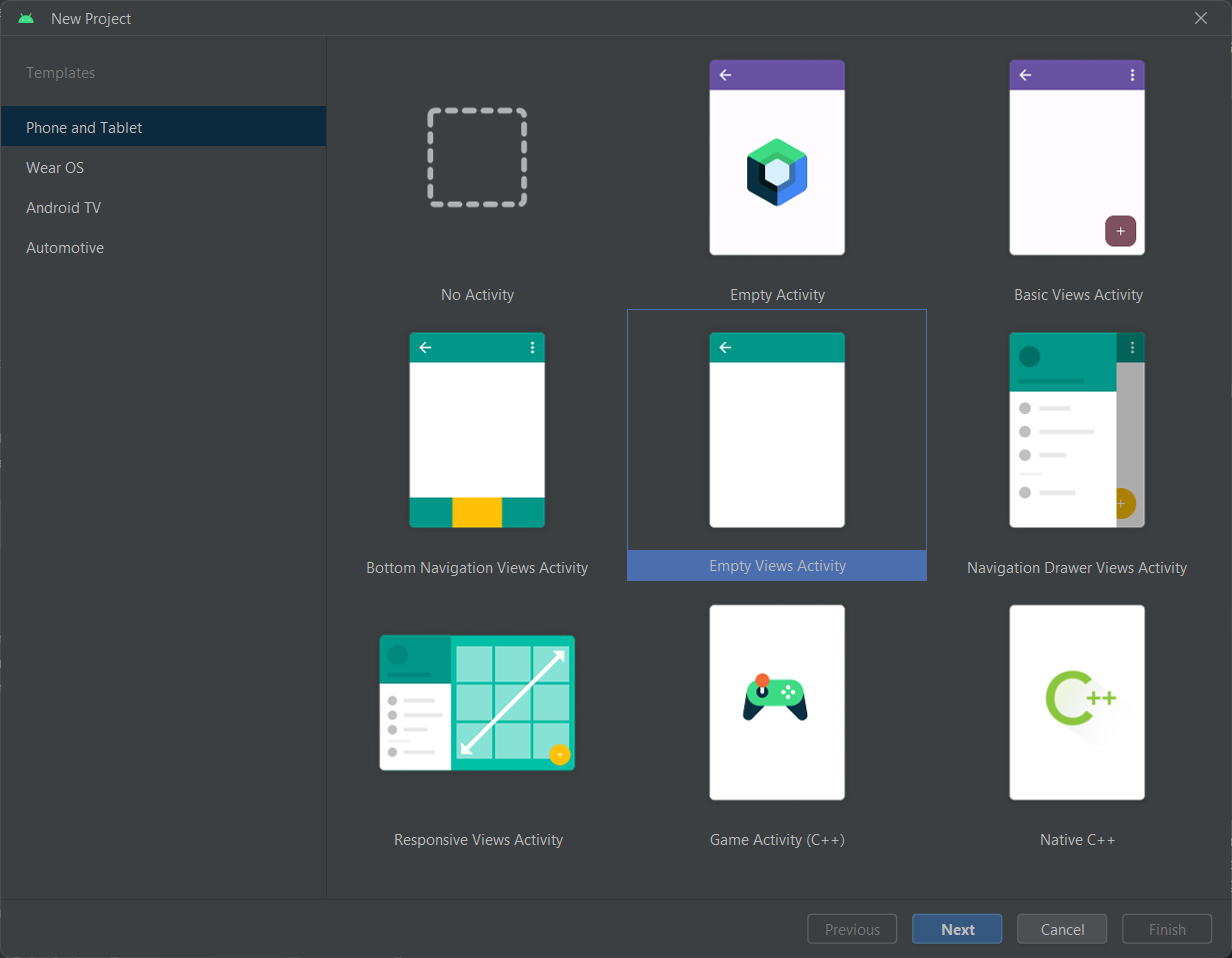
Here, you need to select a project template. You can choose from various templates for any type of Android device: phones, tablets, wearable devices, TVs, Auto. Right now, we just want to create an app for an Android device. Click on the Empty Views Activity and press "Next".
Compose and XML are both ways to build user interfaces in Android. Compose is a newer toolkit introduced by Google that simplifies the process and speeds it up. It makes use of the Composite pattern and declarative programming. XML, on the other hand, uses XML markup language to define UI elements and their properties and requires a separate XML layout file for each screen or layout. This track focuses on XML toolkit, but you will be able to learn Compose in another track on Hyperskill.
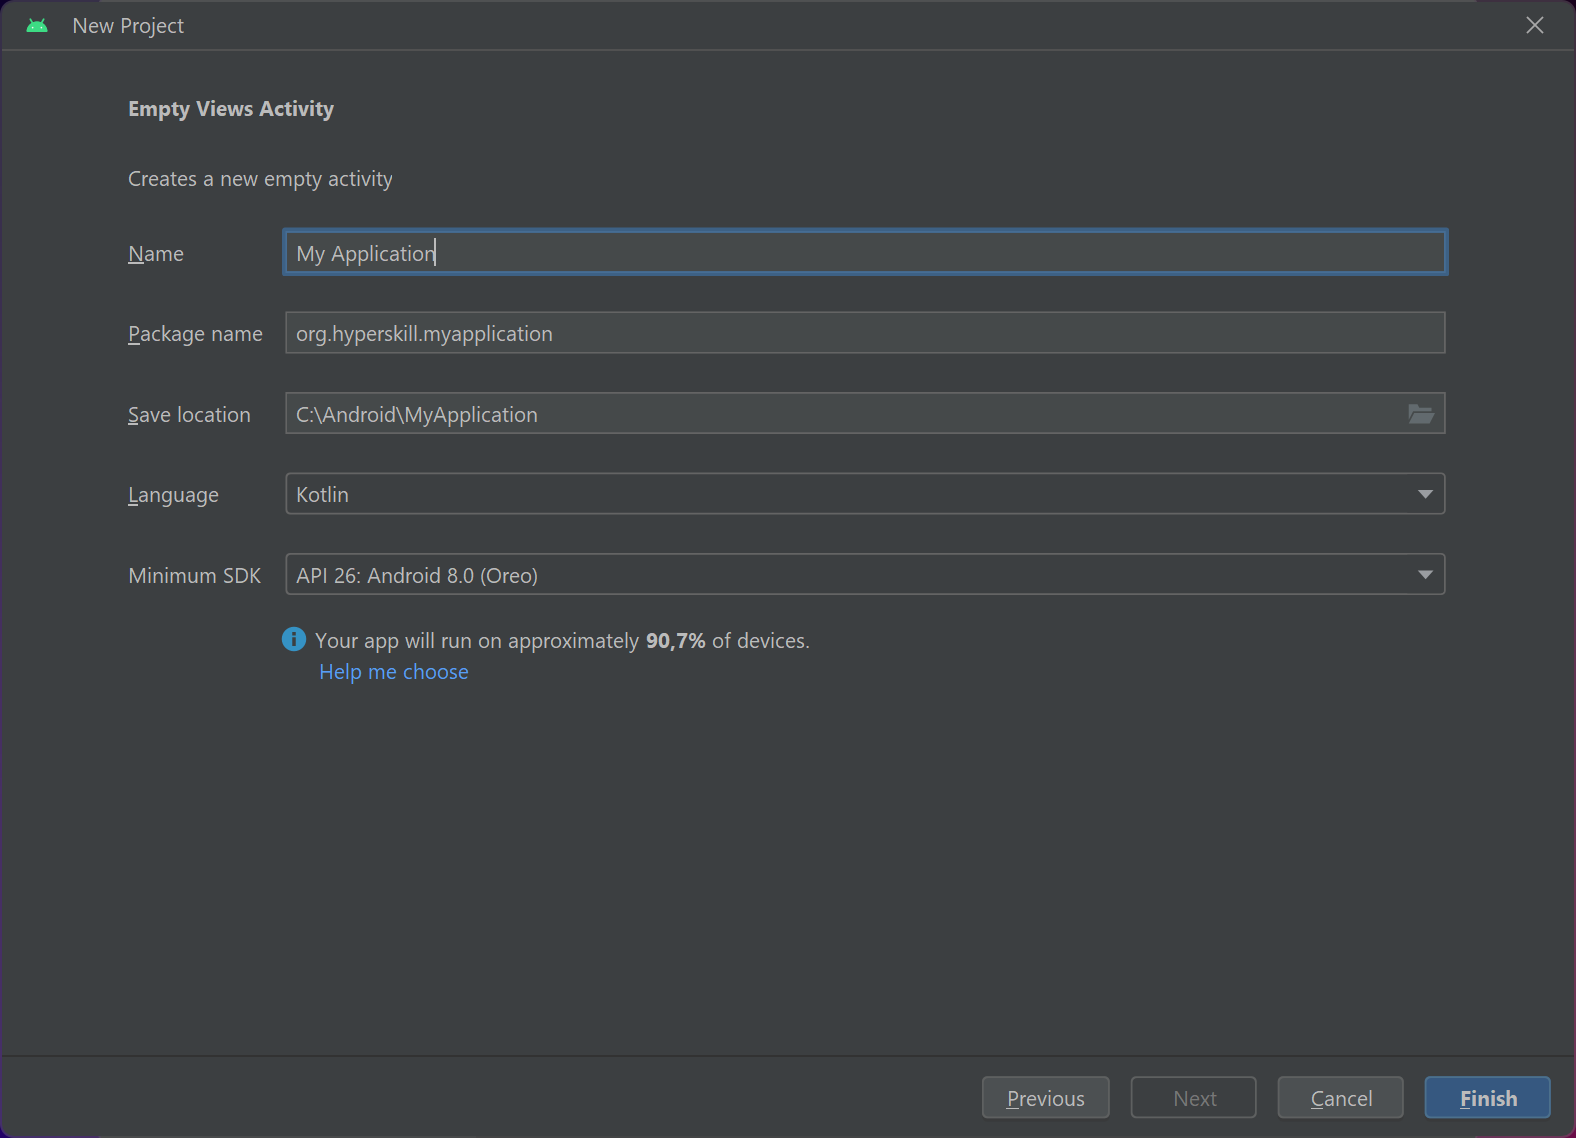
Choose a name for your project. Then, set the project saving location and the programming language for your app. Enter your company or your nickname in the "Package name" field. Usually, it looks like "domain.companyname.appname".
After that, you need to choose the minimum SDK version that your app will support. Choose wisely: do not select the most recent or a very old version of Android. Really old versions are hard to maintain and have fewer users, and brand-new versions also have a limited number of users. Play around with different SDK versions and pay attention to the percentage of devices that will be able to run your app. As of 2023, the best option is probably API 26 and higher.
Click "Finish". Congratulations, you have successfully created your project! Android Studio will build your project, and you will see the Main window.
§3. Project overview
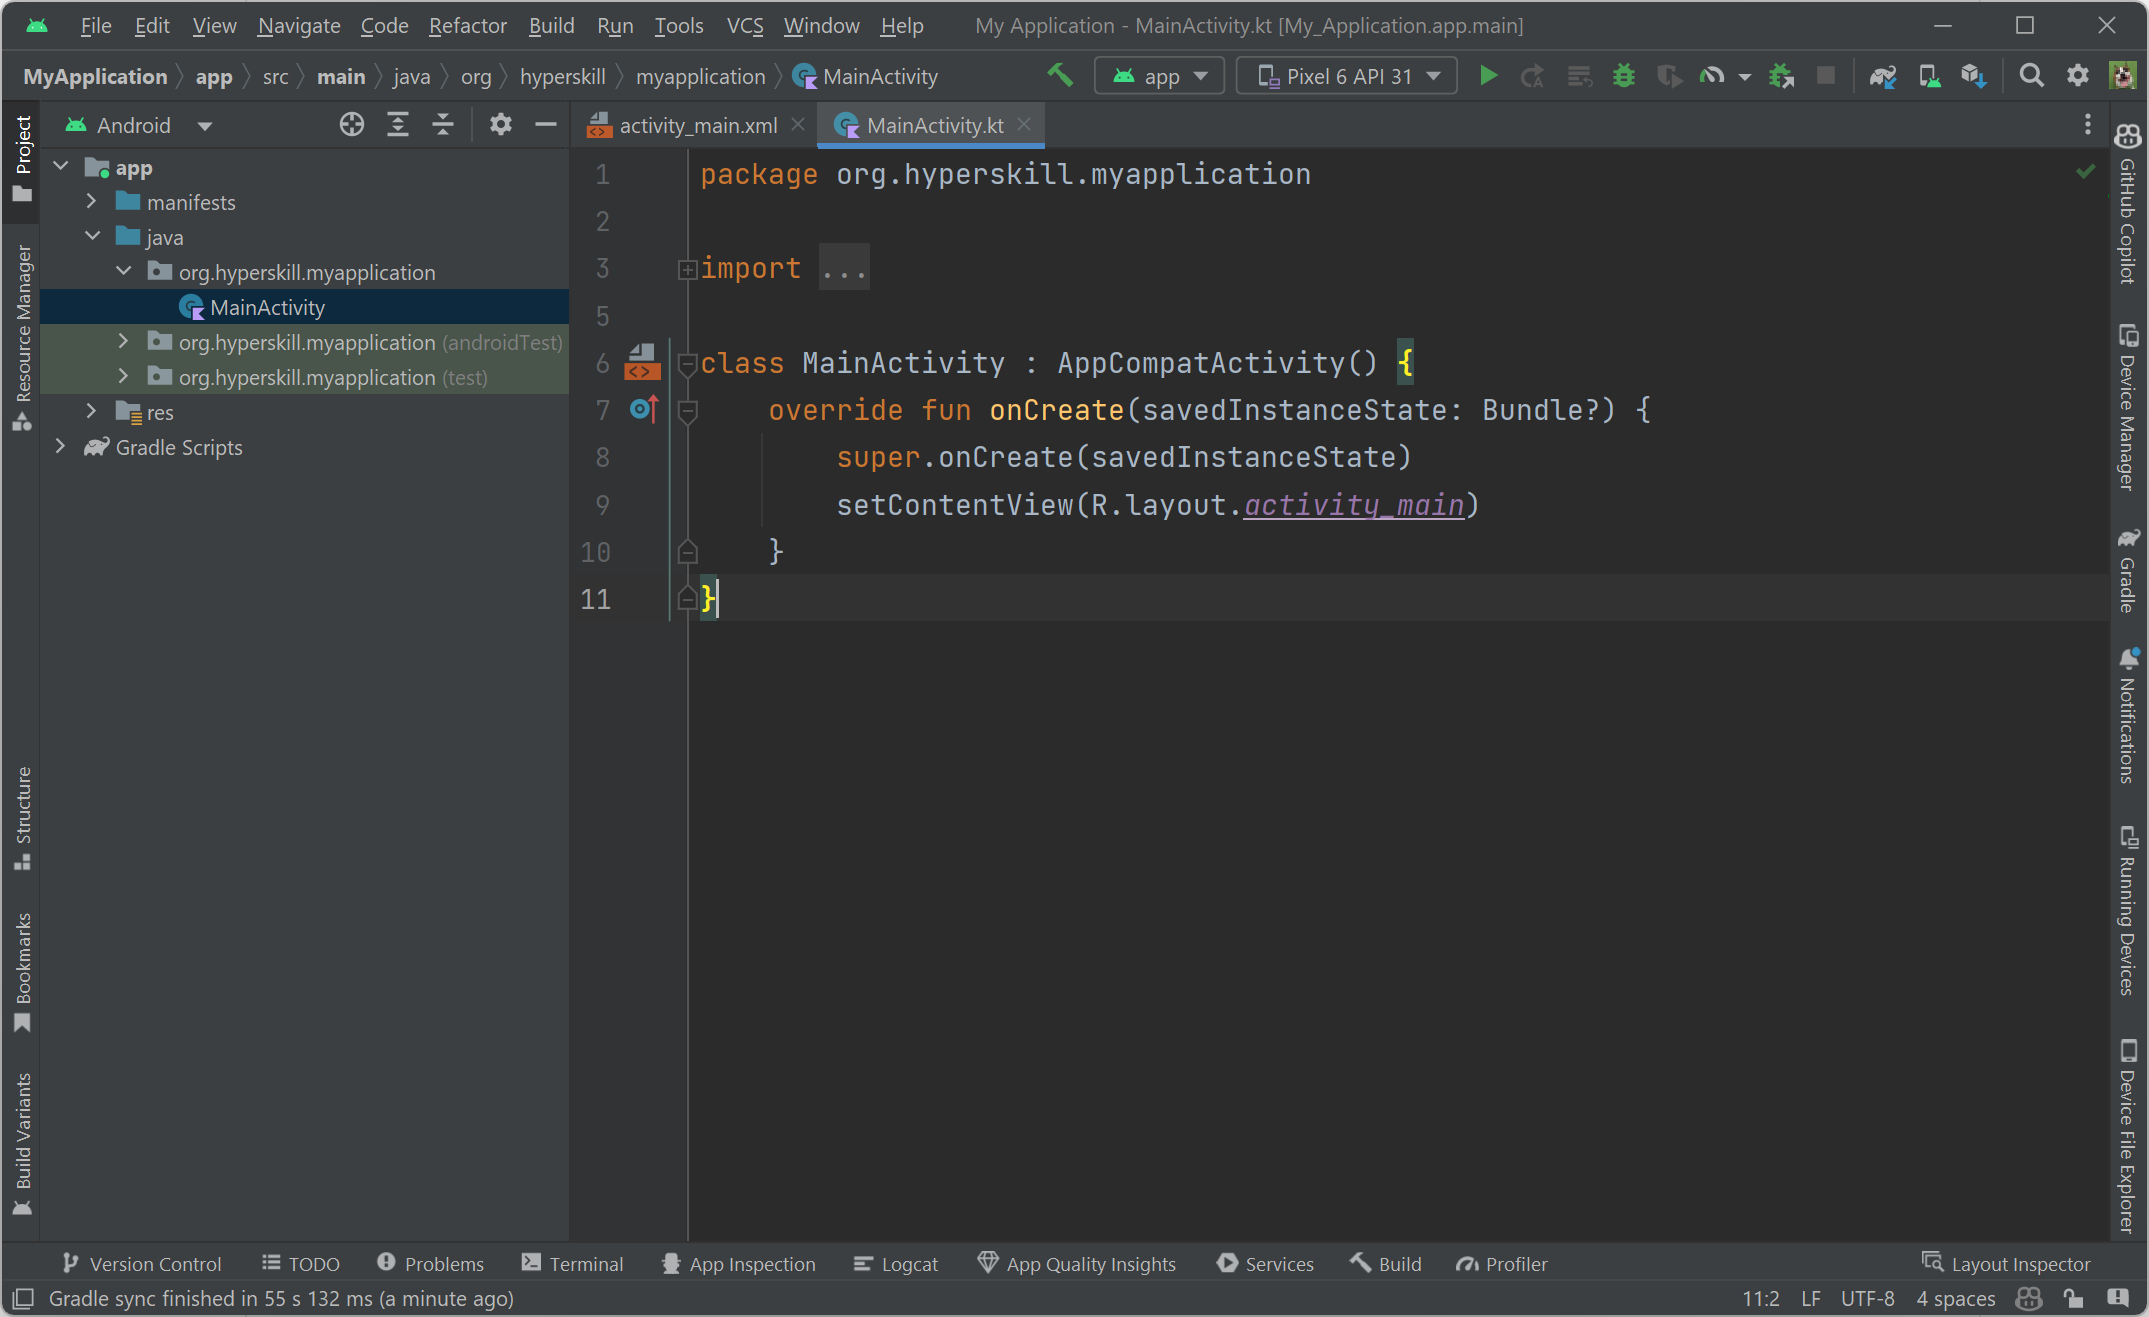
At first sight, this might look a little confusing, but don't worry: you'll figure it out step by step.
On the left side, you can see your Project View. It gives you quick access to your resources, code, and build files. Your code is located in the "java" folder, and your project assets such as pictures, icons, fonts, and texts are located in the "res" folder. If you don't want to be distracted from your code, you can always hide your Project Structure by clicking the "Project" button on the left sidebar.
On the right side, you will see your open files. This is called the Editor window. You can switch between your files in the navigation bar.
At the top, you can see the path to the file you've opened and a toolbar. Toolbar lets you do a whole variety of actions such as building, debugging, and running your app. It also has a lot of useful Android tools that will help you in the development process later on.
Look at all these buttons all around your IDE's window: these are the tools that give you access to specific tasks like search, version control, device files, and more. The most used ones are "Logcat", "TODO", and "Terminal".
The status bar is located at the bottom. There, you can see the status of your IDE and project. All warnings, hints, and messages are shown in the status bar.
To learn more about Android Studio, you can check out the Android Studio Tool Windows topic.
§4. Conclusion
In this topic, we have covered in great detail how to install the IDE and create a project. You know what the main screen looks like and have a basic understanding of the Studio features. Now that you are familiar with Android Studio, you can start developing your own apps!
You can also view Lesson on hyperskill.org.
Practical tasks and answers
Tasks and answer options are given. The correct option is highlighted in blue color.
№1. Android Studio feature
Question: Write a program that reads a sequence of numbers from the first line and the number x from the second line. Then it should output all positions of x in the numerical sequence.
The position count starts from 0. In case x is not in the sequence, print the line "not found" (quotes omitted, lowercased).
Positions should be displayed in one line, in ascending order of the value.
Select one option from the list:
- LogCat
- Android Profiler
- Android Project Wizard ✔
- Android Virtual Device
Explanation. Here is the Python code for the problem:
Example on Python
def find_positions(numbers, x):
positions = []
for i, number in enumerate(numbers):
if number == x:
positions.append(i)
return positions
numbers = [1, 2, 3, 4, 5, 6, 7, 8, 9, 10]
x = 5
positions = find_positions(numbers, x)
if positions:
print(" ".join(map(str, positions)))
else:
print("not found")
This code first defines a function called find_positions(), which takes two lists as input: a list of numbers and a number x. The function then iterates over the list of numbers and checks if each number is equal to x. If it is, the function appends the index of the number to a list called positions. The function then returns the position list.
The main function then defines the list numbers and x. The number list contains the numbers 1, 2, 3, 4, 5, 6, 7, 8, 9, and 10. The x variable is assigned value 5.
The main function then calls the find_positions() function, passing the numbers and x lists as input. The find_positions() function returns the position list, which is then printed to the console.
In this case, the position list will contain value 4, because the number 5 is found at index 4 in the number list. Therefore, the output of the program will be: 4.
If the number x is not found in the number list, the find_positions() function will return an empty list. In this case, the main function will print the message "not found" to the console.
As for the option you need to select, it depends on what you want to do with the program. If you want to debug the program, you can select LogCat. If you want to profile the program, you can select Android Profiler. If you want to create a new Android project, you can select Android Project Wizard. And if you want to create an Android Virtual Device, you can select Android Virtual Device.
The best option for you will depend on your specific needs.
Here is the Java code for the problem:
Example 1 on Java
import java.util.Scanner;
public class FindPositions {
public static void main(String[] args) {
Scanner scanner = new Scanner(System.in);
// Read the sequence of numbers
String[] numbersStr = scanner.nextLine().split(" ");
int[] numbers = new int[numbersStr.length];
for (int i = 0; i < numbersStr.length; i++) {
numbers[i] = Integer.parseInt(numbersStr[i]);
}
// Read the number x
int x = Integer.parseInt(scanner.nextLine());
// Find the positions of x in the sequence
List<Integer> positions = new ArrayList<>();
for (int i = 0; i < numbers.length; i++) {
if (numbers[i] == x) {
positions.add(i);
}
}
// Print the positions
if (positions.isEmpty()) {
System.out.println("not found");
} else {
for (int i = 0; i < positions.size(); i++) {
if (i > 0) {
System.out.print(" ");
}
System.out.print(positions.get(i));
}
}
}
}
This code first creates a Scanner object to read input from the console. Then, it reads the sequence of numbers and the number x from the console.
Next, it creates a list called positions to store the positions of x in the sequence. Then, it iterates over the sequence of numbers and checks if each number is equal to x. If it is, the number is added to the position list.
Finally, the code prints the positions of x. If the number x is not found in the sequence, the position list will be empty and the code will print the message "not found".
Example 2 on Java
import java.util.*;
public class Main {
public static void main(String[] args) {
Scanner scanner = new Scanner(System.in);
String[] numbers = scanner.nextLine().split(" ");
String x = scanner.nextLine();
List<String> positions = new ArrayList<>();
№2. Android Studio
Question: What does this button in the toolbar do?

Select one option from the list:
- Build the project ✔
- Run the app
- Open SDK Manager
- Debug the app
Explanation. Correct answer is Build the project.
№3. Old versions
Question: We briefly discussed what possible problems can arise if you choose an old version of Android while creating your project. So, what exactly is wrong with it?
Select one option from the list:
- Nobody uses old devices, so there's no need to support them.
- It is hard to support old versions of Android. ✔
- You can't run old apps on new devices.
- Old devices don't support apps written in Kotlin.
Explanation. The correct answer is It is hard to support old versions of Android.
Here are some of the reasons why it is hard to support old versions of Android:
- Old versions of Android are no longer supported by Google. This means that they will not receive security updates, which can leave your app vulnerable to attack.
- Old versions of Android may not have the same features or capabilities as newer versions. This can make it difficult to develop an app that works on both old and new devices.
- The market share of old versions of Android is declining. This means that you will be targeting a smaller and smaller audience if you choose to support old versions.
Here are some of the problems that can arise if you choose an old version of Android for your project:
- Your app may not work properly on old devices. This could be due to incompatibility issues, security vulnerabilities, or lack of features.
- You may have to spend more time and resources supporting old versions of your app. This could include testing, debugging, and fixing bugs.
- You may lose users who are using old devices. This could hurt your app's overall user base and revenue.
So, if you are considering choosing an old version of Android for your project, it is important to weigh the risks and benefits carefully. In most cases, it is better to choose a newer version of Android that is still supported by Google and has a larger market share.
№4. Virtual device categories
Question: Let's review the virtual device creation process. What categories are present in the Virtual Device Configuration?
Select one option from the list:
- Auto | Tablet | iPhone
- TV | Phone | Wear OS | Tablet ✔
- Huawei | Samsung | Xiaomi | Honor
- Apple | Google | Amazon | Tesla
Explanation. The correct answer is TV | Phone | Wear OS | Tablet.
The Virtual Device Configuration (VDC) is a dialog in Android Studio that allows you to create and manage Android Virtual Devices (AVDs). The VDC is divided into four categories:
- Phone: This category contains AVDs that emulate Android phones.
- TV: This category contains AVDs that emulate Android TVs.
- Wear OS: This category contains AVDs that emulate Android Wear smartwatches.
- Tablet: This category contains AVDs that emulate Android tablets.
The specific AVDs that are available in each category will vary depending on the Android SDK that you have installed.
The other options in your question are not categories in the Virtual Device Configuration.
№5. Matching
Question: Match each abbreviation with the correct description.
- SDK - A set of tools to create applications on a specific platform
- AVD - A tool to simulate a real device
- IDE - An application that helps you write and test software
Explanation. The correct matching for the abbreviations is:
- SDK - A software development kit (SDK) is a set of tools and libraries that allows developers to create applications for a particular platform.
- AVD - An Android Virtual Device (AVD) is a software emulation of an Android device that can be used to test and develop Android apps.
- IDE - An integrated development environment (IDE) is a software application that provides comprehensive facilities to computer programmers for software development.
№6. File location
Question: Where do files with extensions like .jpg, .mov, .gif, or .txt belong?
Select one option from the list:
- java
- Android Manifest
- Gradle Scripts
- res ✔
Explanation. The correct answer is res.
The res folder in an Android project contains all of the resources for the app, including images, audio files, and text files. The file extensions that you mentioned are all common image and animation file formats, so they would all belong in the res folder.
The other options in your question are not folders that are typically used to store resources.
- The java folder contains the Java source code for the app.
- The AndroidManifest.xml file contains the manifest for the app, which defines the app's components and permissions.
- The Gradle Scripts folder contains the Gradle scripts that are used to build the app.
№7. IDE window
Question: Previously we talked about the elements of the main window. Name a part of the screen that lets you access your resources, code, and build files.
Select one option from the list:
- Editor Window
- Project Structure
- Status bar
- Project View ✔
Explanation. The correct answer is Project View.
The Project View is a pane in the main window of Android Studio that shows the structure of your project, including your resources, code, and build files. You can use the Project View to navigate your project, open files, and manage your project's dependencies.
The Editor Window is where you write and edit your code. The Project Structure is a dialog that allows you to configure the structure of your project, such as the modules that it contains and the libraries that it uses. The Status bar is located at the bottom of the main window and displays information about the current state of your project, such as the line number and column number of the cursor, the current build configuration, and the number of errors and warnings in your code.
Here is a screenshot of the Project View in Android Studio:
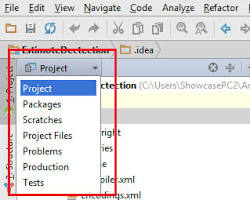
As you can see, the Project View is divided into two main sections: the Project Tree and the Project Files. The Project Tree shows the structure of your project, with each node representing a folder or file. The Project Files shows the contents of the selected folder or file.
You can use the Project View to navigate your project by expanding and collapsing the nodes in the Project Tree. You can also double-click on a node to open the corresponding file in the Editor Window.
The Project View is a powerful tool that can help you manage your Android projects. I recommend that you familiarize yourself with it if you are new to Android development.
№8. Package name
Question: Lucy loves coffee. She decided to create her own app with the best ways to make coffee. She already has a website "lucylovescoffee.com", and her app is called Barista. What should Lucy's app package name be?
Keep in mind that everything should be written in lower case.
Enter a short text: com.lucylovescoffee.barista ✔
Explanation. Lucy's app package name should be "com.lucylovescoffee.barista".
The package name is a unique identifier for an Android app. It is used to identify the app on the Google Play Store and to prevent conflicts with other apps. The package name must be written in lower case, and it can only contain letters, numbers, and underscores.
In Lucy's case, she could use her website domain name as the base for her package name. This would make it easy for users to find her app on the Play Store. She could then add the name of her app to the end of the package name.
So, the package name com.lucylovescoffee.barista would be a good choice for Lucy's app. It is unique, easy to remember, and relevant to the app's content.
Here are some other factors that Lucy could consider when choosing an app package name:
- The length of the name. The shorter the name, the easier it will be to remember and type.
- The availability of the name. The name should be available as an app package name on both the Google Play Store and Apple App Store.
- The uniqueness of the name. The name should be unique enough so that it is not easily confused with other apps.
- The memorability of the name. The name should be memorable so that users can easily find it when they are searching for coffee apps.
Ultimately, the best app package name for Lucy's coffee app is the one that she feels is most relevant, easy to remember, and available.
What is Android Studio? Basic using Android Studio
Android Studio is an integrated development environment (IDE) used for developing Android applications. It provides a comprehensive set of tools and features that streamline the app development process, including a code editor, visual layout editor, debugging tools, and more.
To start using Android Studio, you can follow these basic steps:
- Download and install Android Studio from the official website.
- Launch Android Studio and create a new project.
- Choose a project template, such as "Empty Activity" or "Basic Activity".
- Configure the project settings, such as the project name, package name, and minimum SDK version.
- Use the code editor to write the app's code, or use the visual layout editor to design the app's user interface.
- Run the app on a virtual device or physical device to test it.
- Debug any issues that arise during testing using the debugging tools provided by Android Studio.
These are just the basics, but Android Studio offers many more advanced features that can help you develop high-quality Android applications.
Android Studio is the official integrated development environment (IDE) for Android app development. It is built on JetBrains' IntelliJ IDEA software and designed specifically for Android development. It is available for download on Windows, macOS and Linux based operating systems.
Android Studio provides a number of features that make it a powerful tool for Android development, including:
- A code editor with syntax highlighting, code completion, and linting
- A graphical layout editor
- A debugger
- A profiler
- A built-in emulator
- A testing framework
- A variety of plugins
To write basic code using Android Studio, you can follow these steps:
- Create a new project.
- Choose a template for your project.
- Add some code to your project.
- Run your project in the emulator or on a physical device.
Here is an example of a simple Android app that you can write using Android Studio:
public class MainActivity extends AppCompatActivity {
@Override
protected void onCreate(Bundle savedInstanceState) {
super.onCreate(savedInstanceState);
setContentView(R.layout.activity_main);
}
}
This code creates a simple activity that displays a blank screen. You can customize the look and feel of your app by adding more code to this file.
For more information on how to write code using Android Studio, you can refer to the following resources:
- Android Studio documentation: https://developer.android.com/studio/
- Android development tutorials: https://developer.android.com/training/
- Android code samples: https://developer.android.com/samples/